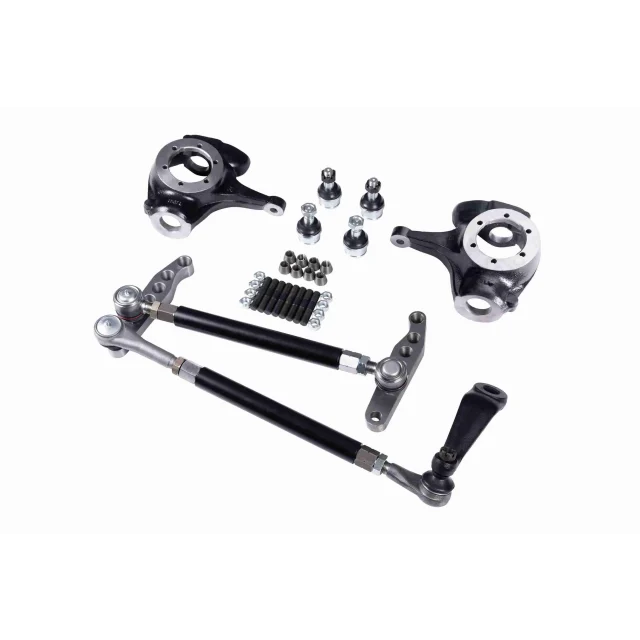
https://www.eastwestoffroad.com/product/ewo-complete-dana-44-chevy-10-bolt-high-steer-crossover-steer-kit-with-knuckles" Upgrading to a Dana 44 high steer crossover kit is one of the smartest ways to fix poor steering geometry after a lift, gain ground clearance, and beef up your front end for hard trails. This friendly, no-nonsense guide walks you through the entire install—from tools to test drive—so you get confident, precise steering without the guesswork. If you want a proven, bolt-on solution, check out the EWO Complete Dana 44 / Chevy 10 Bolt High Steer Crossover Steer Kit with Knuckles. https://www.eastwestoffroad.com/product/ewo-complete-dana-44-chevy-10-bolt-high-steer-crossover-steer-kit-with-knuckles" style="display:inline-block;margin-top:8px;padding:12px 18px;background:#16a34a;color:#fff;border-radius:10px;text-decoration:none;font-weight:700">Visit Here to Get the Complete Kit Why choose a high steer crossover kit? Corrects steering geometry after suspension lifts. Moves the tie rod up and out of harm’s way for better clearance. Uses 1-ton tie rod ends (TREs) or heims for extra strength. Delivers tighter steering feel on and off-road. Pro Pick: The EWO Dana 44 / Chevy 10 Bolt high steer kit includes machined flat-top knuckles and crossover arms—perfect if your existing knuckles aren’t machined. What you’ll need (tools & parts) High steer arms (driver & passenger) – ideally from a matched crossover steering kit like the EWO complete kit DOM tubing + threaded tube inserts (drag link & tie rod) Tie rod ends (common: 7/8" or 1-ton TREs such as ES2234R/L, ES2026R) Pitman arm with proper drop (if stock won’t work) Drill & taper reamer (if knuckles/arms/pitman need tapering) Torque wrench, jack stands/lift, paint pen, angle finder, wrenches, sockets, penetrating oil Steering stabilizer (optional but helpful) Step-by-step installation Step 1: Lift and secure the vehicle Park, set the e-brake, chock the rear wheels. Raise the front end and place jack stands under the frame so the axle can cycle. Clean the knuckles and axle ends; grease and mud make everything harder. Step 2: Remove existing steering Pull the stock/crossover linkage: drag link, tie rod, stabilizer, and pitman arm (if changing). Stubborn hardware? Soak with penetrating oil and use proper pullers. Quick tip: Snap a few photos for reference before teardown. Step 3: Install high steer arms If you have flat-top, machined knuckles, bolt the arms on. If not, use machined replacements like in the EWO high steer crossover kit with knuckles. Torque arm hardware to manufacturer spec (often ~90–100 ft-lbs) and apply thread locker. Step 4: Drill/ream for your ends (if required) Many Dana 44 high steer setups use 1-ton TREs or heims. Ream the knuckles/arms and pitman to the specified taper/size (commonly 3/4"–7/8"). Go slow, keep holes square, and wear eye protection. Step 5: Measure, cut, and prep tie rod & drag link At ride height, mock the tie rod straight between the high steer arms. Mock the drag link from the pitman arm to the passenger high steer arm. Aim for 1/8"–1/4" toe-in (viewed from above). Mark, cut, and weld in threaded bungs where needed. Thread in your TREs, leaving some adjustment room. Alignment Tip: Leave a few threads visible so you can fine-tune toe and steering wheel centering later. Step 6: Install linkage and cycle the steering Bolt in the tie rod and drag link with lock nuts or cotter pins as applicable. Turn lock-to-lock to check for binding, brake-line rub, and clearance to diff cover. If you can, flex the suspension to confirm no contact at bump or droop. Step 7: Final torque + quick alignment Set toe-in to about 1/8". Adjust the drag link so the steering wheel is centered. Torque all hardware to spec. Add a steering stabilizer if you run big tires or see shimmy. Step 8: Test drive & re-torque Take a slow shakedown drive. Turn full lock, hit a few bumps, listen for clunks. Re-torque after 25–50 miles; new parts settle. Don’t skip a professional alignment A shop alignment will dial in toe, steering wheel center, and caster/camber checks. It improves tire wear and stability—especially after a crossover steering upgrade. Common mistakes to avoid Skipping flat-top knuckles: high steer arms need a flat, machined surface. Incorrect tapering: off-angle reaming leads to loose TREs. Zero adjustment left: always leave thread room on the tie rod/drag link. Forgetting re-torque: hardware can loosen after the first few drives. Product spotlight: one-and-done solution If you want a clean, matched package, the EWO Complete Dana 44 / Chevy 10 Bolt High Steer Crossover Steer Kit with Knuckles bundles the arms, machined knuckles, and hardware—ideal for rigs needing Dana 44 high steer and Chevy 10 Bolt support. FAQs (People also ask) Q1. What does a high steer crossover kit do? It relocates steering linkage higher on the knuckle, correcting geometry after a lift, improving clearance, and reducing bump-steer. A quality Dana 44 high steer crossover kit also strengthens weak factory components. Q2. Do I need flat-top, machined knuckles for Dana 44 high steer? Yes—high steer arms require flat-top, machined knuckles. If yours aren’t machined, use a kit that includes them, like the EWO kit with knuckles. Q3. What TRE size is common for Dana 44 high steer? Most use 1-ton tie rod ends (e.g., ES2234R/L, ES2026R) or heims. Match the taper/holes in your arms and pitman. Q4. Will a high steer kit fix death wobble? It can help by improving geometry and reducing play, but death wobble is multi-factor. Check bushings, bearings, tire balance, caster, and toe settings. Q5. Do I need an alignment after installing a crossover steering kit? Absolutely. Do a shop alignment after your initial test miles and re-torque. Q6. Can I keep my stock pitman arm? Sometimes. It depends on lift height, drag link angle, and steering box. Many builds benefit from a dropped pitman arm for ideal angles. Q7. What’s the difference between crossover and high steer? Crossover moves the drag link to the passenger knuckle; high steer positions both the tie rod (and often the drag link) on top of the knuckle using high steer arms. Many kits (like the EWO Dana 44 / Chevy 10 Bolt high steer kit) combine both. Variations Primary: Dana 44 high steer crossover kit, Chevy 10 Bolt high steer kit, Dana 44 crossover steering, high steer arms, 1-ton tie rod ends Secondary: flat-top knuckles, crossover steering upgrade, Dana 44 steering upgrade, off-road steering, drag link and tie rod, taper reamer, ES2234R ES2026R, steering stabilizer, toe-in adjustment, pitman arm drop Long-tail opportunities: How to install a Dana 44 high steer kit Dana 44 high steer with 1-ton TREs Best crossover steering kit for Chevy 10 Bolt Dana 44 flat-top knuckle machining DIY tie rod and drag link setup Dana 44 Integrated Interlinks: In this guide, we naturally linked phrases like Dana 44 high steer crossover kit, Chevy 10 Bolt high steer kit, and crossover steering kit to the product page for better UX and internal SEO. Final thoughts Take your time, measure twice, and torque to spec. With a well-planned Dana 44 steering upgrade, you’ll enjoy tighter control, fewer hang-ups on rocks, and a setup built for real trail use. When in doubt—or if you want an all-in-one solution—grab the EWO Complete Dana 44 / Chevy 10 Bolt High Steer Crossover Kit and hit the trails with confidence. keywords dana 44 high steer crossover kit, chevy 10 bolt high steer kit, dana 44 crossover steering, high steer arms, 1-ton tie rod ends, dana 44 steering upgrade, flat-top knuckles, crossover steering kit, dana 44 drag link and tie rod, taper reamer for tie rod ends, es2234r es2026r tie rod ends, dropped pitman arm, off-road steering upgrade, dana 44 alignment toe in, dana 44 high steer installation guide, best high steer kit for chevy 10 bolt
You may like

https://itvubedaveiasa.com.es/

CBSE 10th Second Board Result 2026 | CBSE 10th Result
CBSE 10th Second Board Result 2026, CBSE 10th Result, CBSE 10th Board Result 2026, CBSE 10th Result 2026